Transform your photos with Luminar Neo, the all-in-one editing solution for photographers. Read my complete review and find out if it’s worth your money.

I recently wrote a comprehensive guide that includes some of the best AI tools for photographers, and one of them is Luminar Neo, software developed by Skylum that is well known for the quality of its products.
I’ve been using Photoshop + Luminar for a long time to edit most of my pictures, but the latest version of Luminar combines AI to speed up the photo-editing process, and the results are pretty amazing.
Before digging deeper into some of Luminar Neo’s features, let me clarify something. Pretty much all the functionality it offers can be manually replicated in Photoshop for advanced users. Photoshop allows a level of manual editing that is not possible with tools such as Luminar. But if you are not a pro-Photoshop user or want to combine the two software, this is where Luminar shines. As you’ll see, Luminar can achieve the same results as Photoshop, but in a fraction of the time and cost, and in some cases, this is a deal-breaker.
If you’re undecided between Luminar Neo and Radiant Photo, check out this review.
What is Luminar Neo

Luminar Neo is a photo editing software that can be used as a stand-alone program or as a Photoshop or Lightroom Plugin, just like Topaz Photo AI (here is my review). In my opinion, this is the best way to use it. You can start editing your RAW files in Photoshop/Lightroom, switch to the plugin to refine your images, switch back to Photoshop, and so on. In a few words, Luminar Neo is an excellent photo-editing tool that can speed up your work and is especially effective when combined with Photoshop.
Luminar Neo: Main features
Skylum is constantly adding new features, so chances are that there will be new ones when you read this article. One important thing to remember is that all edits are applied to a new layer, so you can go back and edit them at any time, just like you’d do in Photoshop. You can also mask/unmask the layers.
The following are the most important tools and the ones that I also use the most:
AI-powered masking

Masking is one of the most powerful features when editing a picture. But it’s also a tool that takes a long time to master. Luminar Neo uses AI to automatically examine the image and identify its elements. As you can see in the pictures, it correctly selects and masks the water.
Using the AI to examine the image can take a few seconds, but you only need to do it once per image. It can happen that the selection is not perfect, but you can then manually adjust it within the same panel.
AI Enhancement

Sometimes, you don’t have time or the budget to spend much time post-processing your images. This is where the Enhance AI feature comes in handy. Adjust the two sliders to instantly improve the picture.
As you can see, this filter tends to oversaturate the image, so you might want to use it carefully unless you want to create an HDR-style photo.
Sky replacement

The advanced sky replacement tool is one of the reasons why Skylum became popular in the first place. In my experience, this feature either works amazingly or doesn’t work at all. As you can see in the pictures, I successfully replaced the sky with one click. I could have done it in Photoshop, but it would have been much slower.
The main issue is the lack of advanced merging features, which can be solved using dedicated plugins. In any case, I’m very impressed by how easy this is to do. The other limitation is that in Luminar, you can find only a small library of skies to use, and if that’s not enough for you, you have to purchase some more, and they are not cheap.
Structure AI

The Structure AI tool allows you to adjust the image’s detail and clarity. You can use it to reveal more details or get a smoother image with less detail, and it’s the primary tool for increasing the image’s contrast.
The main disadvantage is that it introduces a lot of noise and can ruin the image if overused. Like the other tools, you can improve the image by using it carefully.
Powerlines and Dust removal

This is one of my favorite features. It lets you remove those pesky power lines and dust spots in seconds. Using Skylum’s powerful AI, Luminar examines the image and automatically cleans it.
Sometimes the results aren’t great, but you can use the erase feature to undo part of the edit. Also, in this case, you can do the same thing in Photoshop, but it takes longer, and the AI isn’t as advanced. In my opinion, Luminar is the winner.
Sunrays

You can easily add realistic sun rays or glow and manually place them in the pictures, all in a couple of clicks. You can change many settings, such as sunray length, radius, warmth, penetration, number, etc. If used correctly, it can significantly improve your images.
If, for example, you have a part of the image where the lights are blown out, you can use this feature to add a realistic sun and quickly fix it.
Magic Light AI

Magic Light AI is a Pro filter you can get with the extension pack (use the code FABIO10 for a 10$ discount).
All it does is manipulate artificial light sources like street lamps, but it does it well. By changing the number of beams, it can simulate costly lenses. The AI accurately identifies the light sources, but you can refine the selection using the mask settings.
Relight AI
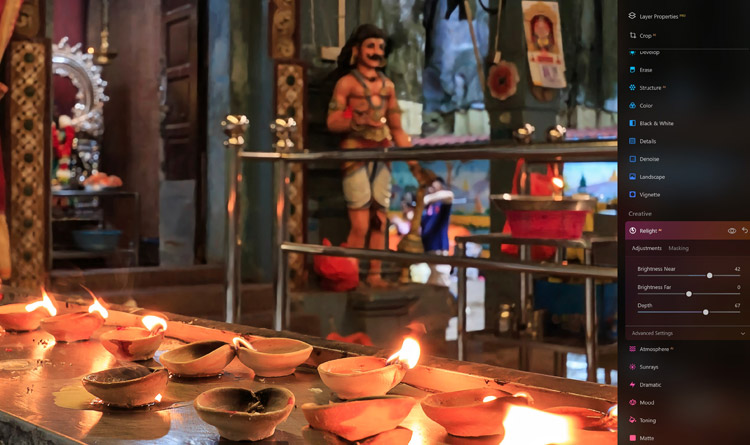
Relight is another AI-powered feature that has received a lot of hype. According to the website, “It analyzes the scene in three dimensions. By creating a 3D map of a photo, Luminar Neo can spread light naturally in 3D space across a 2D image.”
In my opinion, it is not really that great. You can quickly achieve the same result with a simple mask in Photoshop. That said, there are a few cases where the results are better with Luminar Neo.
Portrait tools
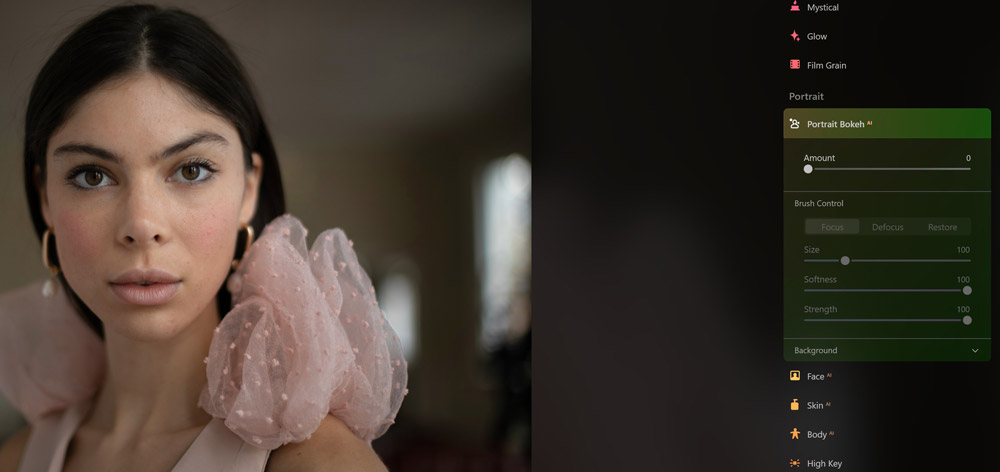
In addition to a series of tools for landscape photography, Luminar Neo offers filters and enhancements for portrait photography.
You can add Bokeh and improve the face using AI to identify and selectively work on the eyes, mouth, teeth, or skin.
Panorama stitching
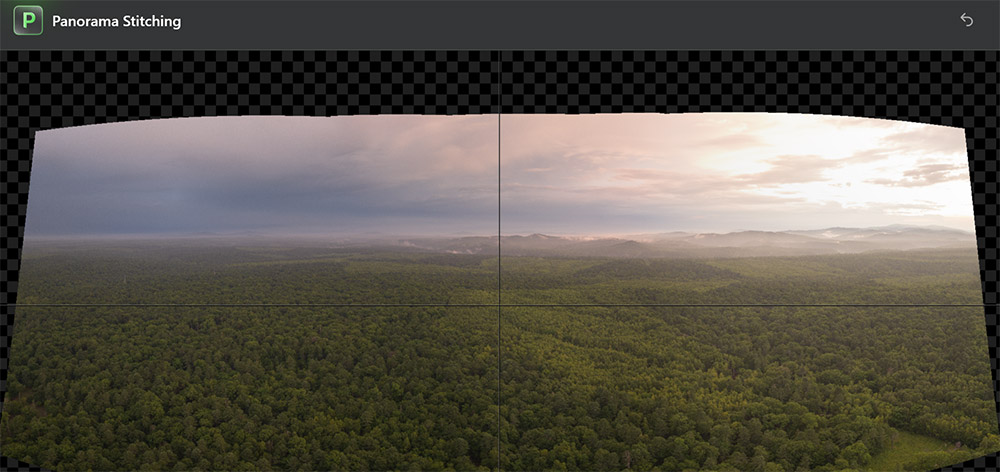
This is one of the latest features added and one of my favorites. I often take panoramic photos with my drone, especially with the secondary lens, and I can easily merge them with a simple click.
This tool lets you combine panoramic photos at different exposures (bracketing).
Extensions and Other Luminar Neo features

On top of the vast number of settings available in the base version, you can buy extensions separately (not recommended) or in a bundle (use my link to get the discount and add the coupon code Fabio10 for an extra $10 off). The Magic Light and Noiseless extensions are great. You can choose between the monthly plan and the lifetime purchase. I recommend the last one.
These are all the features currently available in Luminar. They are nicely arranged per category, and all are applied to a new layer.
Essentials
- Develop
- Enhance AI
- Erase
- Structure AI
- Color
- Black & White
- Details
- Denoise
- Landscape
- Vignette
Creative
- Relight AI
- Sky AI
- Atmosphere AI
- Sunrays
- Dramatic
- Mood
- Tonight
- Matte
- Mystical
- Glow
- Film Grain
Portrait
- Portrait Bokeh AI
- Face AI
- Skin AI
- Body AI
- High Key
Professional
- Supercontrast
- Color Harmony
What’s New in the Luminar Neo Spring Upgrade
Luminar Neo has evolved a lot since its first release, and the latest Spring Upgrade focuses heavily on portrait photography while also improving flexibility for creators who edit across multiple devices. The latest update introduces several AI-powered tools designed to speed up editing and reduce manual work. The biggest additions include:
Desktop version
- Improved Bokeh AI that now works not only on portraits, but also on objects and subjects in more complex scenes
- New Dark Circles Removal inside Face AI
- Expanded Skin AI with: Face Skin Smoothing, Body Smoothing, New Mask Feather controls for smoother and more natural masking transitions
Mobile version
- Bokeh AI: Previously, it worked mostly as a portrait-oriented feature, simulating shallow depth of field around people. It can now isolate and blur objects as well.
- Face Light
- Face Slim
- Improved blemish removal
Pros and Cons of Luminar Neo

Like any other software, Luminar Neo has its pros and cons. Here are a few of them:
Pros
- Intuitive and user-friendly interface
- The AI sky replacement tool is amazing
- Great AI power line and dust removal tools
- It works in layers, like Photoshop
- Fast and responsive, especially compared to the previous versions
- You can try it for free for up to 7 days
Cons
- Heavy use of your RAM
- It doesn’t have any keyword tagging feature like Lightroom
- Presets are no longer editable
- Exposure-blending has its limits and is not as effective as specialized plugins
- Lack of batch editing features
Should you get Luminar Neo?

Well, it depends. As I mentioned earlier, Luminar is a fantastic tool if you are not an advanced Photoshop user and/or think Photoshop is too complicated. If you are just getting started with photo editing, Luminar Neo is a no-brainer. It’s also cheaper than Adobe’s software, which requires a monthly subscription.
Another thing to consider is your photo editing style. You probably won’t need it if you mainly do reportage photography and don’t change much in your pictures besides white balance, exposure, shadows, and highlights. But in every other case, chances are you’ll greatly benefit from the AI tools and automation that Luminar Neo offers.
The power line and dust removal tools will save you a lot of time. The same goes for the AI Sky replacement tool, which I believe is the best in the market.
I hope this review clarified a few doubts. As I stated at the beginning of the article, I use Luminar, and I’m very satisfied with the results despite a few minor issues.
If you enjoyed this review, check out my guide to selling AI-generated images. Don’t miss my review to Amazing Aerial.


